Editorial
Upscale a DJ Press Photo to 4K Without Turning Skin Into Plastic: A Practical Checklist

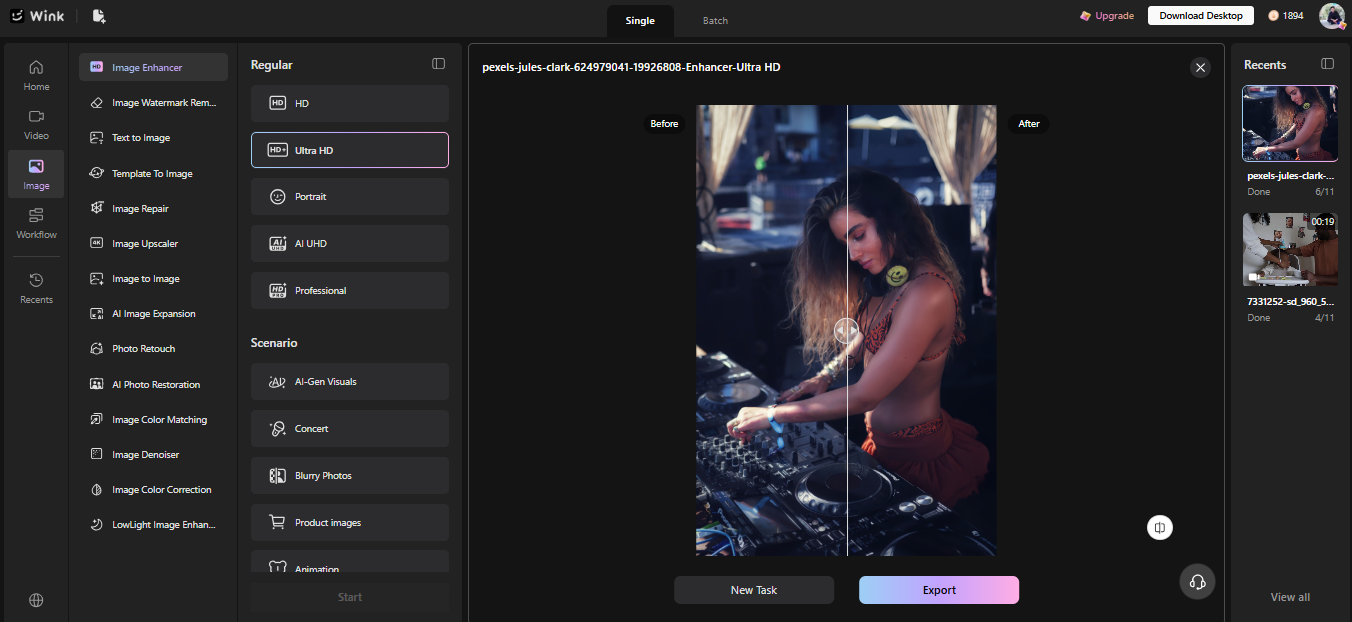
Upscaling a DJ press photo for festival posters, streaming banners and large venue displays requires more than simply increasing its resolution – preserving natural skin texture, individual hair strands and realistic detail is just as important.
An electronic music artist (EDM) is gearing up for a large festival set. Their press photo has to be versatile for a Tomorrowland-style lineup poster, a Spotify artist banner, a SoundCloud banner, and an LED display at the nightclub.
Something’s still wrong, though. The skin looks smoothed over and almost airbrushed; the hair has this faint glow where it meets the background.
The first instinct? Sharpen it more. It looks soft, after all. But it usually makes things worse.
Here’s the thing. That waxy look was never a softness problem. It’s actually a missing texture problem.
Sharpening adds edge contrast, not the pores and strands that already got smoothed out of existence. If you push it too far the DJ begins to resemble an entirely different entity. Not the kind of image you want to project when fans know you solely from the festival posters, music releases, and social media.
What actually solves this comes down to sequence: denoise, upscale, and stop at one clean pass instead of stacking several passes on top of each other.
Why DJ’s Skin Turns Waxy and Hair Gets Halo Edges
Most upscaling models run on convolutional filters. These filters were built to remove noise. Skin and hair are exactly where that logic breaks down.
- Skin gets read as noise. Pores and fine lines are high-frequency detail, tight little variations packed close together. Sensor noise looks the same way to a filter trained on frequency, not meaning. So the model flattens both. What’s left is skin with a perfectly even tone. And when that face appears on a large EDM festival poster, especially against neon lights and dark backgrounds, the artificial look becomes even harder to ignore.
- A sharper original can lose more, not less. More resolution just means more real texture sitting in the file. Since the filter can’t tell “pore” from “grain,” there’s simply more to misread and smooth away. A slightly softer photo sometimes survives better, with less fine detail there to begin with.
- Hair edges get guessed, not traced. Sharpening passes work by boosting contrast along a clean edge. Hair isn’t clean. It’s hundreds of semi-transparent strands drifting over the background at different angles. The filter estimates where the edge probably is and sharpens that guess instead. When it misses the real boundary by a pixel or two, you get a faint glow where hair meets background. It’s because the edge was never real to begin with.
How to Upscale a DJ Image to 4K Without Losing Natural Skin Texture.
Imagine you’ve got a DJ on the rise who wants to up-res his or her press shot for a tour. You need the same image to work as a Soundcloud/Spotify banner, gig poster and print behind the decks.
Denoise Before Anything Else.
First things first, check the image for noise. That’s the part upscaling hits hardest, and hits first. Any grain sitting in the original gets stretched along with everything else once the resolution goes up, so cleaning it now saves a lot of trouble later.
Start with an AI image enhancer for this. Our aim is to clean out the noise without sacrificing the nuances that give a press shot of an EDM artist its heat: the getup of the DJ, the headphones, the shades, every hair strand, and the way skin looks in the studio and through the neon.
A good one can tell the difference between random pixel noise and actual details in this picture, like:
- The color of the outfit.
- The fabric of her shirt.
- The strands of her hair.
Since this is a portrait, use the enhancer’s portrait mode, rather than a general or scene mode.
Portrait-only processing is meant to process skin and hair differently from the rest of the image. This is especially helpful in the case of EDM artists, where the moody lighting, dark backgrounds, and colorful FX can make it easier to spot over-processing.
Most enhancers offer a few processing modes to pick from; HD, AI UHD, and Professional mode are common ones.
Each is tuned differently, and picking the wrong one for the job matters more than people expect.
Now download this image for upscaling.
Upscale Once, Not in Passes.
Right now the image sits at 3412 x 5120, which isn’t enough to hold up for print or a larger frame, so the next step is running it through the upscaler to close that gap.
Therefore, we need to run the image through Wink in a single pass.
With every upscale pass, minor approximations of details missing in the original are made. This means that fewer passes equate to less room for error piling on top of each other.
Determine your target resolution by how you plan to use the output. Choose between various upscaling resolutions like 4K or 8K.
Running it through the upscaler has it up to 4320 x 6483, well past the 300 DPI threshold an 8×10 print needs.
After the upscaled output is complete, ensure you go over it:
- Pore and skin texture: Portrait-only processing is meant to process skin and hair differently from the rest of the image. Which is especially helpful in the case of EDM artists, where the moody lighting, dark backgrounds, and colorful FX can make it easier to spot over-processing.
- Hair strands near the edges: individual strands should stay distinct, not blend into a soft mass
- Fabric weave or clothing texture: fine patterns like knit or tweed often show over-smoothing before skin does.
- Eyes and eyebrows: halo artifacts tend to show up here first if the upscale was too aggressive
When the upscaled image passes all 4 checkpoints, you can proceed further.
Use Pores and Hair as Your Quality Checkpoint
Before the image is exported or modified, view it on-screen at full magnification to check texture, not only its general sharpness.
The photo may be sharp from a normal viewing distance and yet lack the details that made it look realistic at full magnification.
This step takes a minute, but skipping it is how an over-processed image ships without anyone catching it, until it’s already on a lineup poster, an Instagram post, or a club’s LED screen at full size.
Two areas to zoom into first:
- Skin. Especially the cheeks and forehead. Look for pores and tonal variations. If the skin is perfectly smooth with no variation of any kind, it’s been overdone in the retouching process.
- Hairline and flyaways: check for strands being distinct from the background. A soft glow or a blurred edge where hair meets background means the upscaler guessed wrong at that boundary.
The 6-Point Upscaling Checklist
- Zoomed in and checked the original for grain or noise before touching the upscaler
- Ran enhancement in portrait mode, not general or scene mode
- Picked a processing mode built for portraits, not just the strongest-sounding one
- Upscaled once, directly to the target resolution, no stacked passes.
- Choose the output size based on actual use, screen, print, or banner, not the highest number available.
- Zoomed into pores, hairline, and fabric texture on the final output before exporting
Each one is a standalone action someone can check off while working on the file; no need to have read the sections above to know what it means.
Signs You’ve Over-Processed the Image
- Skin looks symmetrical in a way real skin isn’t. Actual faces carry slight asymmetry in texture. For example, one cheek is not a perfect match for the other. When smoothing gets applied evenly across the whole face, that natural imbalance disappears, and it looks off even if nothing else seems wrong.
- Texture ignores the light. Real pore visibility shifts with lighting angle, more visible where light rakes across skin, less where it’s flat. Over-processed skin holds the same texture (or lack of it) everywhere, regardless of where the light actually falls.
- Skin and fabric don’t match. If hair or clothing still shows sharp detail while skin looks suspiciously smooth, that’s a sign denoising was too aggressive, specifically in skin tones, not the whole image.
- Fine detail near the eyes vanishes first. Small shadows and lines under the lower eyelid go before cheek texture does. Checking there catches over-processing earlier than scanning the whole face.
The Real Reason This Matters
For a DJ in the EDM world, a press shot is not only a good head shot, but it’s also an essential piece of the artist’s brand. That very same photo could be the face of the lineup at a festival, on a Spotify playlist, a club flyer, or even projected behind the DJ as they perform.
And here’s the catch. Even a badly blurred photo still looks like it’s been taken by a professional, but a heavily filtered photo? Not so much. You walk past a massive festival poster of your favourite DJ and your mood turns sour when you realise they look like a plastic cyborg.
EDM editors and promoters require high resolution images that capture quality without sacrificing the minor details. The crowd isn’t there to see an abstract face or body, they want to see who they are following in the livestream.
So don’t go overboard. Denoise once, upscale once, observe the texture of your hair, skin, and clothes before exporting. The objective is not to make the DJ look flawless, but to give a photo a professional appearance with the artist still recognizable.